Stochastic Supply and Demand Forex Trading Strategy
One of the main key questions traders have to answer when trading the forex market is where and when to take their trades. Traders may easily identify which direction to take their trades. However, many would still find themselves in a losing position even though price generally moved in the direction of their trade. On the other hand, traders who not only knows the direction to take, but also where in the chart they should consider making a trade are the ones who are able to enter the market at the right time and at a better price.
Supply and Demand techniques is probably one of the most effective ways to identify where in the chart traders should consider making a trade. In fact, most professional traders employ a supply and demand or market flow type of trading strategy.
Some supply and demand traders even go to the extent of placing their pending limit entry orders on supply and demand zones without a trading signal. Even though it may seem too risky not waiting for a reversal signal, but these traders still make money doing that. This is a testament to how effective proper supply and demand techniques could be.
However, trading using supply and demand could be difficult for new traders as this technique requires a lot of practice and screen time to master.
Here we will be looking at the use of a supply and demand indicator to help us objectively identify supply and demand zones with ease.
Supply and Demand Indicator
Traditionally, supply and demand zones are manually identified by traders. Demand zones are basically areas on the price chart where price quickly bounced going up. The assumption is that there are many traders willing to take a buy trade on this area. On the other hand, supply zones are the exact opposite. These are zones where price quickly bounced back down. Again, the assumption is that there are many traders willing to take a sell trade in this area. Some traders even assume that there are pending orders in the said area which caused price to bounce quickly.
Traders would usually mark the area by plotting rectangular zones dragged towards the far right of the price chart. Traders would then usually anticipate reversals as price reaches these areas.
Supply and Demand indicator simplifies this process by automatically identifying these zones for the trader. It is still based on the same concept of price moving quickly away from the area causing a prior swing point.
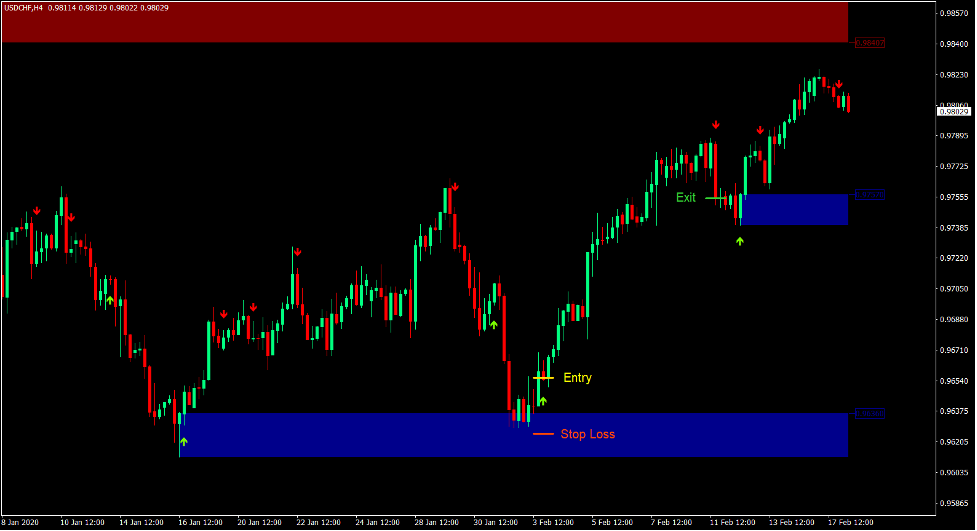
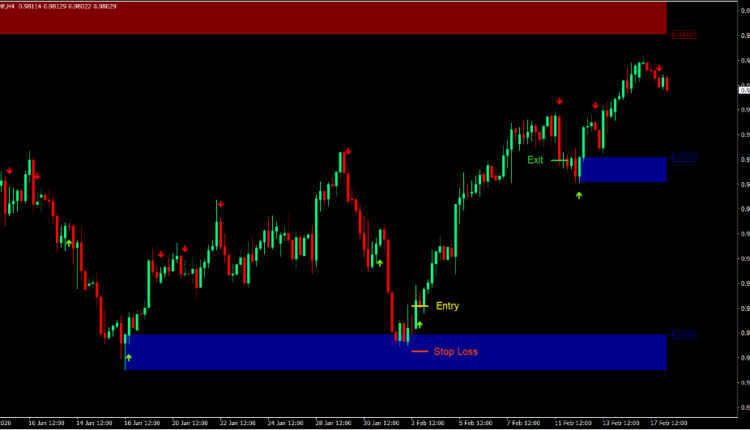
The indicator plots a dark blue zone to indicate a demand zone and a maroon zone to indicate a supply zone. Traders could use these areas to anticipate trend reversals as price tends to bounce off these areas.
Stochastic Cross Alert
The Stochastic Cross Alert indicator is a custom indicator which is based on the Stochastic Oscillator.
The classic Stochastic Oscillator is a staple oscillator type of technical indicator which indicates momentum, as well as overbought and oversold market conditions. It plots two lines which oscillate within the range of 0 to 100. Crossovers between the two lines indicate a possible reversal of momentum. Lines crossing over above 80 indicate a bearish mean reversal coming from an overbought price condition. On the other hand, lines crossing over below 20 indicate a bullish mean reversal coming from an oversold price condition. These reversals signals tend to have a high probability since the reversals are coming from an overbought or oversold condition. Price tends to reverse back to its mean after being overbought or oversold.
The Stochastic Cross Alert indicator is based on this concept. It plots arrows indicating a reversal based on the Stochastic Oscillator. Arrows pointing up indicate a bullish reversal, while arrows pointing down indicate a bearish reversal.
Traders can use these arrows as an entry signal as these signals tend to have a high win probability.
Trading Strategy
Stochastic Supply and Demand Forex Trading Strategy is a supply and demand type of trading strategy which incorporates the stochastic oscillator reversal indications as an entry trigger.
The Supply and Demand indicator automatically plots the supply and demand zones which we will be using to anticipate possible reversals.
Price action should revisit the area of a supply or demand zone. As price touches the zone, price action should show signs of reversal. This should then be followed by the Stochastic Cross Alert indicator plotting an arrow indicating a possible reversal. This would serve as our entry trigger.
Indicators:
- Stochastic_Cross_Alert
- SupplyDemand
Preferred Time Frames: 1-hour and 4-hour charts
Currency Pairs: FX majors, minors and crosses
Trading Sessions: Tokyo, London and New York sessions
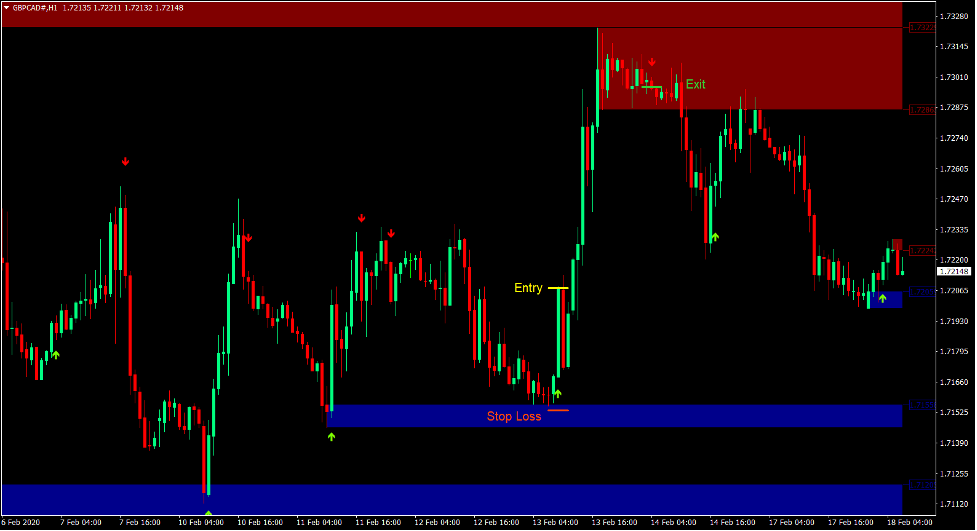
Buy Trade Setup
Entry
- Price should revisit a demand zone.
- Price action should show signs of bullish price rejection on the area.
- The Stochastic Cross Alert indicator should plot an arrow pointing up.
- Enter a buy order on the confirmation of these conditions.
Stop Loss
- Set the stop loss on a support level below the entry candle.
Exit
- Close the trade as soon as the Stochastic Cross Alert indicator plots an arrow pointing down.

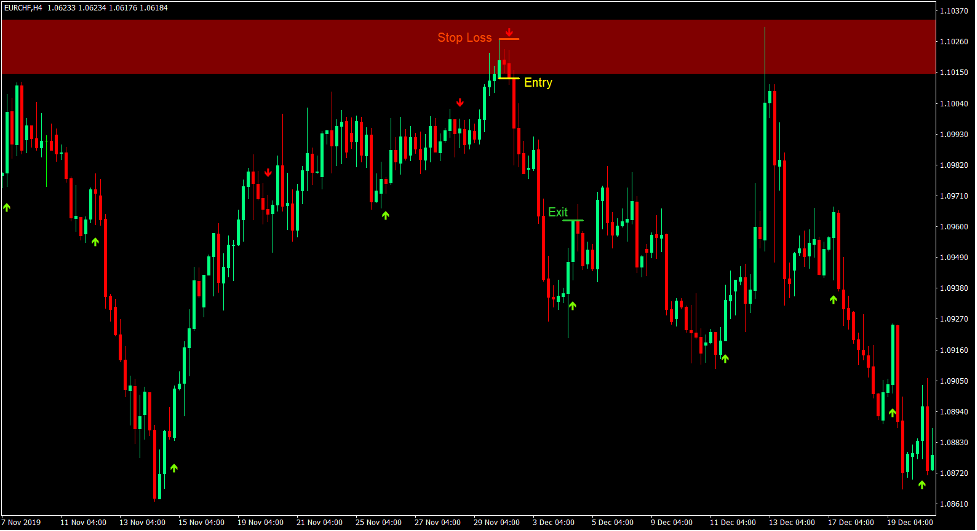
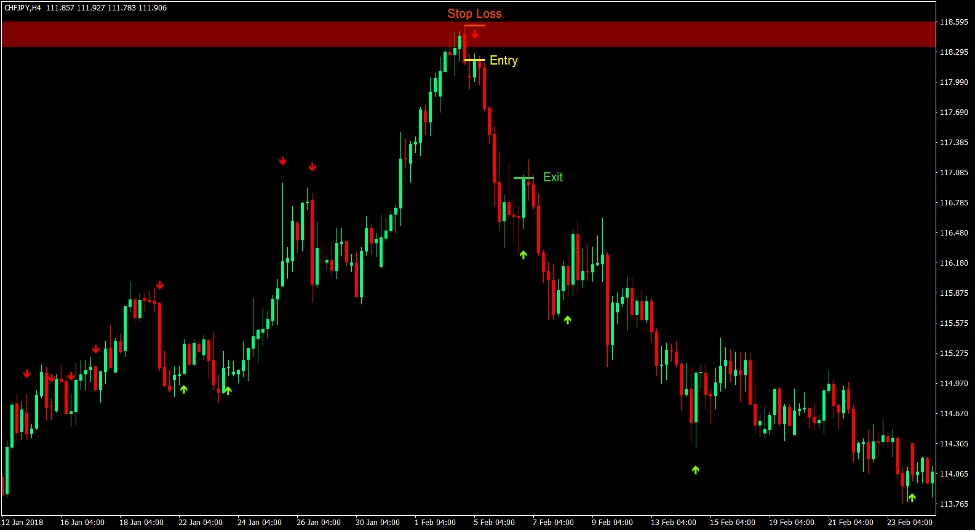
Sell Trade Setup
Entry
- Price should revisit a supply zone.
- Price action should show signs of bearish price rejection on the area.
- The Stochastic Cross Alert indicator should plot an arrow pointing down.
- Enter a sell order on the confirmation of these conditions.
Stop Loss
- Set the stop loss on a resistance level above the entry candle.
Exit
- Close the trade as soon as the Stochastic Cross Alert indicator plots an arrow pointing up.
Conclusion
Supply and Demand trading is a very effective type of trading strategy. In fact, many professional traders employ such kind of strategy or a variation of it.
However, trading using the Supply and Demand technique could be very difficult for new traders as identifying these zones need practice.
This strategy simplifies the process by using a technical indicator which automatically plots the supply and demand zones.
The Stochastic Cross Alert indicator further simplifies the process by helping traders identify valid reversals instead of relying purely on price action to identify reversals.
Traders can now systematically trade Supply and Demand strategies without second guessing their decisions.
Forex Trading Strategies Installation Instructions
Stochastic Supply and Demand Forex Trading Strategy is a combination of Metatrader 4 (MT4) indicator(s) and template.
The essence of this forex strategy is to transform the accumulated history data and trading signals.
Stochastic Supply and Demand Forex Trading Strategy provides an opportunity to detect various peculiarities and patterns in price dynamics which are invisible to the naked eye.
Based on this information, traders can assume further price movement and adjust this strategy accordingly.
Recommended Forex MetaTrader 4 Trading Platform
- Free $50 To Start Trading Instantly! (Withdrawable Profit)
- Deposit Bonus up to $5,000
- Unlimited Loyalty Program
- Award Winning Forex Broker
- Additional Exclusive Bonuses Throughout The Year

>> Claim Your $50 Bonus Here <<
Click Here for Step-By-Step XM Broker Account Opening Guide
How to install Stochastic Supply and Demand Forex Trading Strategy?
- Download Stochastic Supply and Demand Forex Trading Strategy.zip
- *Copy mq4 and ex4 files to your Metatrader Directory / experts / indicators /
- Copy tpl file (Template) to your Metatrader Directory / templates /
- Start or restart your Metatrader Client
- Select Chart and Timeframe where you want to test your forex strategy
- Right click on your trading chart and hover on “Template”
- Move right to select Stochastic Supply and Demand Forex Trading Strategy
- You will see Stochastic Supply and Demand Forex Trading Strategy is available on your Chart
*Note: Not all forex strategies come with mq4/ex4 files. Some templates are already integrated with the MT4 Indicators from the MetaTrader Platform.
Click here below to download:
Get Download Access

Comments are closed.